Rebooting IP cameras remotely

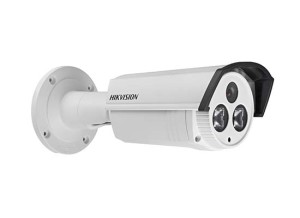
Hikvision

Complete Hikvision API documentation is available here.

To reboot remotely a Hikvision IP camera, all one needs to do is ‘PUT’ /System/reboot:

curl -X PUT --user {USERNAME}:{PASSWORD} http://{CAMERA_IP}/System/reboot

Dahua

Complete Dahua API documentation is available here.

To reboot remotely a Hikvision IP camera, all one needs to do is 'GET' /cgi-bin/magicBox.cgi?action=reboot:

curl --user {USERNAME}:{PASSWORD} http://{CAMERA_IP}/cgi-bin/magicBox.cgi?action=reboot

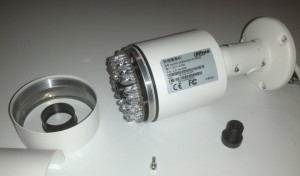
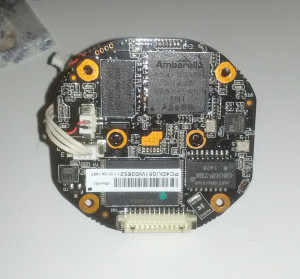
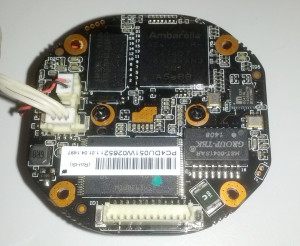
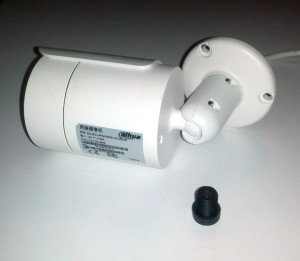
inside of Dahua IPC-HFW4300S

I have decided to switch back from 8mm lens to 3.6mm lens (Mega brand, sold as 3.6mm, f2.3, M12, for 1/3″ sensor).

Disassembly is fairly straight forward.
dahua-ipc-hfw4300s-000
Note: there is no need to remove screw from the back of the camera. It looks like it is covering a breathing hole (the screw does not hold anything).

Unscrew the front half:
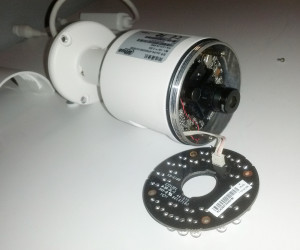
dahua-ipc-hfw4300s-001

The IR LED PCB is held by couple of screws:
dahua-ipc-hfw4300s-002

In case of lens change there is no need to disassemble further. But for curiosity I continued.
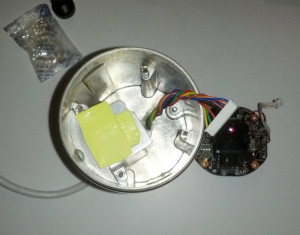
The SoC board is held by another couple of screws and two screw posts that IR LED PCB was screwed into. These posts can be unscrewed by flat screw driver.
dahua-ipc-hfw4300s-003
Interestingly enough the camera is mostly empty space, the raised part of the body inside is used as heat sink (covered by yellow heat sink pad). There was a bag of silica gel inside.

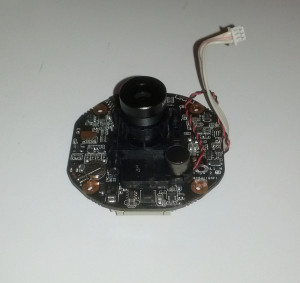
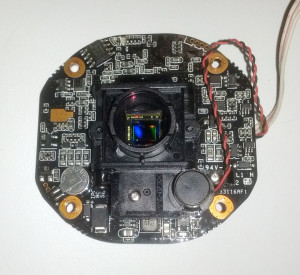
The SoC board with lens:
dahua-ipc-hfw4300s-004
Lens is simply threaded on the sensor body, secured by locking nut. Everything was finger tight. The locking nut is transferred to the new lens and then the whole thing is assembled back, except IR PCB and front cover. Focusing is done on live camera, preferably with a special pattern. The trick is slightly “over” focus, and then tighten the locking nut (while holding the lens).

Back of SoC board:
dahua-ipc-hfw4300s-005

dahua-ipc-hfw4300s-006

Here what states on the “CPU”:

Ambarella
A5s-CO-RH
A1407
N6WY4-AN3
1N1
A5s88

Here is the front of SoC with lens removed:

dahua-ipc-hfw4300s-007
The dust speckle on the sensor was courtesy of Chinese aliexpress seller (probably when they replaced the lens to 8mm).
EDIT: the unpopulated 4 pin header (top right) is for the Serial (RS232) connector, the unpopulated 2 pin header (bottom left, next to battery) is for the reset button.

I used a bit of sticky tape to remove the dust speckle without leaving anything else on the IR filter.

The screws were one time use only (made out of Chinesium) so I replaced them with nice stainless steel screws.

exploring Dahua firmware

A sidetrack from these two posts: Extracting password from Dahua firmware image and Dahua IPC-HFW4300S

To recap: I managed to extract various UBI (NAND flash) images from firmware image.

binwalk -e {firmware_file}

Which gave me the following files:

check.img
custom-x.ubifs.img
dhboot.bin.img
kernel.img
partition-x.cramfs.img
pd-x.ubifs.img
romfs-x.ubifs.img
user-x.ubifs.img
web-x.ubifs.img

I started with romfs-x.ubifs.img as initial grep revealed it contained root password hash (matched to ‘vizxv’).

Mounting UBIFS is not a straight forward (eg cannot use loop).
With help of two guides I found (here and here) I managed to figure out how to mount these images.

apt-get install mtd-utils
modprobe nandsim first_id_byte=0x20 second_id_byte=0xaa third_id_byte=0x00 fourth_id_byte=0x15
modprobe ubi mtd=0
tail -c+65 romfs-x.ubifs.img > romfs
ubiformat /dev/mtd0 -f romfs
ubiattach -p /dev/mtd0
mkdir target
mount -t ubifs /dev/ubi0_0 target

note: tail -c65 strips the header.

mounting contents of romfs-x.ubifs.img gives some insight on the root file structure:

drwxr-xr-x  2  500  500 5192 Apr  2  2013 bin
drwxr-xr-x  7  500  500  480 Feb 18  2012 dev
drwxr-xr-x  6  500  500  960 Feb 24  2013 etc
drwxr-xr-x  2  500  500  160 Jan 13  2012 home
drwxr-xr-x  2  500  500 4832 Feb 22  2013 lib
lrwxrwxrwx  1  500  500   11 Dec 31  2013 linuxrc -> bin/busybox
drwxr-xr-x 13  500  500  864 Dec  5  2012 mnt
drwxr-xr-x  2  500  500  160 Jan 13  2012 nfs
drwxr-xr-x  2  500  500  160 Jan 13  2012 proc
drwxr-xr-x  2  500  500  160 Jan 13  2012 root
drwxr-xr-x  2  500  500 2728 Dec 25  2013 sbin
drwxr-xr-x  2  500  500  160 Jan 13  2012 share
drwxr-xr-x  2  500  500  160 Jan 13  2012 slave
drwxr-xr-x  2  500  500  160 Jan 13  2012 sys
lrwxrwxrwx  1  500  500    8 Dec 31  2013 tmp -> var/tmp/
drwxr-xr-x  2  500  500  160 Jan 13  2012 usr
drwxr-xr-x  3  500  500  224 Jan 13  2012 var

looking at /etc/inittab:

...
::sysinit:/etc/init.d/dnode
::sysinit:/etc/init.d/rcS
...

the /etc/init.d/dnode sets up some of the device nodes, nothing interesting there…
while /etc/init.d/rcS contains some interesting stuff:

/sbin/ubimkvol /dev/ubi6 -s 2500000 -N config
mount -t ubifs ubi6_0 /mnt/mtd

Here what I found out from contents of each UBIFS file:

UBIFS description
check.img contains some hardware IDs
custom-x.ubifs.img /mnt/custom customisation files?
dhboot.bin.img bootloader
kernel.img kernel image
partition-x.cramfs.img contains partition.txt
pd-x.ubifs.img /mnt/pd/ product description files
romfs-x.ubifs.img / root
user-x.ubifs.img /usr/
web-x.ubifs.im /mnt/web/ webUI related files

Interesting bit regarding partition-x.cramfs.img, that it contains partition.txt:


#       name                cs         offset              size         mask_flags
  U-Boot,             0, 0x0000000000200000,    0x0000000000100000, RW
  hwid,               0, 0x0000000000300000,    0x0000000000100000, RW
  updateflag,         0, 0x0000000000400000,    0x0000000000100000, RW
  partition,          0, 0x0000000000500000,    0x0000000000100000, RW
  custom,             0, 0x0000000000600000,    0x0000000000340000, RW
  product,            0, 0x0000000000940000,    0x0000000000340000, RW
  Kernel,             0, 0x0000000000c80000,    0x0000000000580000, RW
  romfs,              0, 0x0000000001200000,    0x0000000000800000, RW
  web,                0, 0x0000000001a00000,    0x0000000000800000, RW
  user,               0, 0x0000000002200000,    0x0000000001980000, RW
  syslog,             0, 0x0000000007200000,    0x0000000000400000, RW
  config,             0, 0x0000000007600000,    0x0000000000400000, RW
  backup,             0, 0x0000000007a00000,    0x0000000000400000, RW
  END

all this is effort was to find the telnet password...
I am missing /mnt/mtd mount point, specifically /mnt/mtd/Config/passwd file, which looks like contains telnet password (possibly?)...

UPDATE: solution to the password debacle is here (at the end of the article).

Now the question where the portion of the telnet password 7ujMko0 comes from? "Inspecting" (running strings) telnetd binary from flash image reveals that it is hard coded into telnetd. If Dahua ever changes that value I know where to find it now.

Extracting password from Dahua firmware image

I wanted to access my Dahua IPC-HFW4300S via telnet (as there is no ssh access).
Unfortunately Dahua does not provide the root password (purposely, as it is hardcoded backdoor).
The currently documented password (vizxv) does not work.

So I got the firmware image (which is achievement, considering Dahua stance on firmware) and managed to extract hash.

First of all the firmware image needs to be extracted from zip, I’ll skip this part and jump straight into extracting binary parts from the firmware:

binwalk -e {Firware_File}

The binwalk utility should have extracted the following files:

check.img
custom-x.ubifs.img
dhboot.bin.img
kernel.img
partition-x.cramfs.img
pd-x.ubifs.img
romfs-x.ubifs.img
user-x.ubifs.img
web-x.ubifs.img

the file of interest is romfs-x.ubifs.img as it has hits when grep-ed for ‘root’:

root:$1$jSqQv.uP$jgz4lwEx2pnDh4QwXkh06/:0:0:root:/:/bin/sh

Now we have a hash which we can brute force with John The Ripper tool.

I settled for 1.8.0 jumbo version with CUDA support.
CUDA seems to be about 2.5 times faster on Nivida GTX560ti than a very beefy 2x Intel Xeon E5-2660 (with 20 cores total).

Particular thing to I had to do to compile (beyond wget-ing and un-tar-ing the arhive) is to modify the entry from gcc-4.6 to gcc-4.8 in Makefile, as it would throw compilation error (gcc-4.6: error trying to exec ‘cc1plus’: execvp: No such file or directory).

line 152:

CCBIN = /usr/bin/gcc-4.8

‘make’ once done that (and libssl-dev is installed), and it should compile.

to run:

./john --format=md5crypt-cuda {hash_file}

The password turns out to be ‘vizxv’ (without quotes). This is not the telnet password (possibly console password).

UPDATE:
I was directed towards correct password here: http://www.cctvforum.com/viewtopic.php?f=19&t=44381

Here are telnet credentials
username: admin
password: 7ujMko0{webui_admin_password}

For example webUI admin password is 123456 then the telnet password is 7ujMko0123456

Subaru Genuine Parts in New Zealand

I have owned numerous Toyotas in past.
When switching from Toyota to Subaru I did not expect to be shocked by such price difference of genuine parts between each brand.
Both Japanese, both of good quality vehicles, similar niche…

Oil and air filters are priced very close (about ~$20NZD for oil filter and ~$40NZD for air filter), beyond that Subaru parts are rip-off.

For example, for my 1998 ST205 Celica GT4, the genuine front brake rotors were ~130NZD each. About double of aftermarket from BNT or Partmaster.
Considering brake rotors are consumables that is very reasonable price.
When I inquired about rotors for my 2008 GRB Subaru WRX STI (JDM), initially I was quoted ~1060NZ each (retail), that came down to $900NZ each. After shopping around I found the cheapest price in New Zealand for genuine front rotor would be ~$695NZ each (trade price BTW).

What is the difference between Toyota Celica GT4 and Subaru WRX STI rotors:
dimensionally they are very close:
315mm x 32mm
vs
326mm x 30mm
So please explain to me why such a price difference?
Genuine Brembo rotors can be bought in USA for about $160USD retail (it would cost uneconomical amount of $$$ to get them shipped to NZ).

Another example is another consumable, brake pads, Toyota Genuine front pads for ST205 Celica (very similar to STI pads) cost about ~$90NZD.
Subaru, at first I was quoted ~$730NZD, then I got “trade” price of ~$620NZD (from Winger). In USA same pads cost around $200USD ($260NZ).

So given the options I got rotors from Partmaster (“Italian made”) for $90NZD each, and pads (Bendix SRT) from BNT for $280NZD a set. Bendix SRT pads were later replaced by Ferodo DS2500 all round (a bit better pad in my opinion).

When I imported my STI it had rear cargo blind missing (BTW Subaru calls it “TONNEAU COVER”, Part number 65550FG002ML).
I enquired about it locally, Winger quoted me ~$430NZD and that was “trade” price (fuck that differentiation). The retail was about $630NZD. For piece of vinyl on a stick with a spring, FFS!?!?
Same part in USA costs around $140USD ($180NZD).
In Japan I got price of 22000JPY, which works out to $235NZD (I don’t have to pay shipping due to special arrangements).
So how does $250 (retail) item becomes $630 item, by just arriving to NZ?

I don’t even dare to think about how much Subaru will charge me for wear items like shocks (Toyota price is ~$140NZD each) and bushes…

Hopefully due to Toyota’s stake in Subaru will have some culture changes, which will lead to price standardisation, making consumables cost like consumables (and not gold-pressed latinum). One would only hope.

Buying Hikvision cameras in New Zealand

This is how you buy genuine Hikvision cameras in New Zealand:
You don’t.

All I wanted to buy is a genuine Hikvision camera locally (with correct Language flag set in firmware, and basic support).
I went onto global Hikvision website and checked listed distributors for New Zealand. I also e-mailed Hikvision regarding the New Zealand distributor.

The Hikvision website lists Atlas Gentech as their distributor. This was confirmed via email as well.

From quick look on Atlas Gentech website it appears that they are deal with trade only (ie wholesale shop).
I have contacted Atlas Gentech, and they confirmed that you need to be a company to deal with them.
They provided me with couple of their customers I could enquire regarding buying Hikvision cameras.
Both of the contacts given were security companies (not a retail shop), as well as what appeared to be “one-man” operations. The security companies naturally have no interest in selling hardware to customers, they are more naturally inclined to sell services (ie. installation and monitoring). There is simply a conflict of interest there to start off.

I have contacted these companies. Only one responded.

Originally I have enquired about DS-2CD2032-I with 12 mm lens. I have been told that it is unavailable and was given two options:
DS-2CD2232-I5 for approximately $700NZ + GST (~$620USD). BTW I have bought DS-2CD2232-I5 from Aliexpress for $95USD. The most expensive DS-2CD2232-I5 on Amazon was around $240USD, while the US version (with correct language flag) is sold around $170USD.
and DS-2CD4232FWD-I a vari-zoom/vari-focal camera for approximately $1200 + GST (~$1073USD). The DS-2CD4232FWD-I can be bought for about $400 USD on Aliexpress.

The camera bought from Aliexpress physically does not differ from cameras that being sold here. The only difference is the language flag (which is fixable), and obviously support/CGA.

I also found that the Aliexpress sourced camera can be bought on trademe for $250NZ ($194USD).

I had expectations of paying maybe 2 times of the US Version, the expectations were completely shattered when Atlas Gentech confirmed that quoted $700NZD + GST was reasonable (and not bullshit RRP price). lets assume that US Version retails for $200USD (a bit higher than $170USD on Amazon). The $620USD is over 3 times of the retail price of US Version.
Remember when camera sold on Aliexpress for $95USD the Alixpress makes a cut, the seller on Alixpress makes a cut and the Hikvision still makes a profit. Looking at the cost of Ambarella SoC (wholesale around $20USD), the cost of making the camera is around $40-50USD. Selling camera for $620 USD is pure greed.

Hikvision is blatantly ripping off New Zealanders, because they can. Shame on you Hikvision for doing so, and shame on you for artificial differentiation of the markets by setting the language bit. Geo-locking in Internet world is stupid and futile.

Shame on you Hikvision for violating GPL as well, since when I bought the cameras there was no mention of the licence, and the camera definitely uses GPL licensed software. The GPL code requests were fallen to silent ears. This company is behaving like a greedy parasite, taking from community and not giving anything back.

Hikvision DS-2CD2232-I5

20131022075601627970

Bought it from Aliexpress as I have completely given up on sourcing genuine camera in New Zealand.
Ordered with 12mm lens option for the driveway monitoring.

Internally it is exactly the same as Hikvision DS-2CD2032-I IP camera. Same CPU/RAM/Sensor/Firmware.

Externally it is rather large and bulky. It is all metal construction, except the default mount – flimsy plastic. I have used an arm from an old CCTV camera, it bolted perfectly fine to one of the bottom threaded holes. It had another threaded hole at the back giving plenty of mount options. The hood adjustment did not make any sense, fully extended at around half of centimetre, it looks like the screw (which was also a bit too small) holding it was put in slightly wrong place.

One thing I didn’t like is the cable was external, on DS-2CD2032-I it is routed internally through mount allowing for more discreet installation. I simply used split piece of 20mm conduit around it to make it more difficult for cutting.

The IR LEDs are very powerful, in fact they are too powerful as number plates are not visible due to excess light bounced from reflective surface. As bonus it lit up the area for other camera.

With 12mm lens it has sufficient zoom to clearly see along our long drive way.

Picture sample (day):
Hikvision-DS-2CD2232-I5-day

Picture sample (night):
Hikvision-DS-2CD2232-I5-night

plastidip – awesome, but not in NZ

Rubber Dip Spray Gallon

Plastidip! What an awesome idea, change your car colour without the actual damage and cost of actual paint job. It is completely reversible, and creates a protective rubber like layer.

Made by Performix, here is some official info http://dipheadsunite.com/how-it-works/

Heavily promoted on social media by www.dipyourcar.com
Here is their youtube chanel.
They explain really well what is plastidip:

They sell nice kits, like this one:
Professional Large Car Extra Coverage Kit 4 Gallons
For very affordable, $384 USD (~$500 NZD) it has everything that is need to do a reversible colour change.
What an awesome product.

Not in New Zealand.

dipyourcar.com will not ship to New Zealand due to it being dangerous goods. That is understandable.
I don’t really need a kit, all I need is about 10L or so of actual dip, so I enquired with Performix regarding who can sell me 3.78L cans of the stuff, to which I was sent to their local distributor Griffiths.
When called Griffiths regarding the price and availability I was sent to their resellers as they do not deal with public (very common in NZ, goods pass resellers two or three times, while each takes a cut before they get to public).
Their reseller could not give me price immediately, but upon calling back they came up with ridiculous ~$550+GST for 1 can of 3.78L plastidip.
Compared to $59.74US (~$78NZD) dipyourcar.com.
With that price, it would cost me about $2500-3000 to dip my car. A quality respray job is about $5000, and good old wrapping in vinyl is about $2000-$3000 (without me doing anything). It makes no sense!

I bet that dipyourcar.com still makes a lot of money by selling these cans at $60USD.

Since then I found another retailer that sells these cans for slightly more affordable ~$250. So now it would cost me about $1000 to “dip my car”. Still that price is over 250% mark-up.

As usual kiwis being ripped off by fellow kiwis.
How dare these greedy business owners to complain that online shopping is killing their business if their business is 100% based on ripping people off?
This is why people go to length to pay retail prices in USA, get things shipped for exuberant shipping costs via Youshop, pay Duty+GST for importing goods and deal of limited support due to shipping costs.
It is not like the sellers in USA do not make money of the sales to kiwis…

Most common excuse I hear from such greedy businesses is it is expensive because of Consumer Guarantee Act, but hold on a second, what about Amazon, and how easy it is to return the items, they still didn’t run out of business, did they?

What I think is actually happens is there is an old breed of greedy and lazy types of “business” people who think that by marking up 1000% on the price will guarantee easy wealth. Suckers will pay anything right? Wrong. This is slowly dying off, thanks to age of Internet.

Hikvision DS-2CD2032-I IP camera part 2

continuation from Hikvision DS-2CD2032-I IP camera

As a quest to solve the dropped frames issue I have upgraded the firmware from Version V5.2.0 to V5.2.3.
This was done successfully, except the interface has switched to Chinese (and no option to choose otherwise).

Model DS-2CD2032-I
Serial No. DS-2CD2032-I20141014CCCH482137191
Firmware Version V5.2.3 build 141024
Encoding Version V5.0 build 140714

Basically the camera I bought supposed to be international version but upon inspecting the serial number it looks like it is Chinese.

The Chinese versions have CCCH while international version have CCWR in their serial numbers. Cameras that sold as “International Version” on amazon are actually Chinese versions with multilingual interface. The correct camera to buy is “English Retail” version. Caveat Emptor!

I found a workaround without modifying the firmware: drop into developer console in the browser and type the following:

javascript:chooseLanguage("en");

There is also a hack by CBX here . This is a permanent solution, but I will probably not go that way since I don’t need use WebUI very often. Shame on you Hikvision for having regions! Since it is same hardware and software anyway…

So far with new firmware I cannot see any changes whatsoever (that concern me).
The loadavg is still very high (around 4). Not sure about original problem, will need to run the camera for a while (since it does not manifest itself immediately).

I have contacted CBX and he as kind enough to provide me with the patch for token amount of money in exchange.
The camera now has correct language ID:


# prtHardInfo
...
language                        = 1
...