Asus CN60 is a good platform to re-purpose to run vanilla Linux on, since they come with decent CPU, while RAM can be upgraded to 16GB, and SSD to 512GB.
Unfortunately out of the box they come locked down by Google, with non-standard BIOS/UEFI, making it not possible to wipe the useless ChromeOS in favour of something like Ubuntu.
Fortunately there is a way to un-Google-fy it.
I followed these instructions with 50% (1 out of 2) success rate. For some reason second Chromebox (identical to first) got bricked. Possibly it got bricked because I had to recover the ChromeOS due to SSD being blank. BTW even though Google insist on using Chrome App on Windows or Mac, it can be done on linux via this shell script.
By bricked I mean no power to USB and no display output. It would power on for ~30seconds and power off.
After searching for solution it seems the only way is to re-flash the BIOS/UEFI Flash via SPI. I followed (to a degree) these instructions.
The difference was is that I didn’t had patience or wanted to spend money on SPI adapters so I settled for a compromise: Raspberry Pi.
Raspberry Pi comes with an SPI bus feature via GPIO pins. I was in luck that the flash (Winbond 25Q64FVSIG) was 3V and not 1.8V.
Always check the datasheet for voltage of your flash, also make sure it is Winbond 25Q and not 25Z (not BIOS/UEFI).
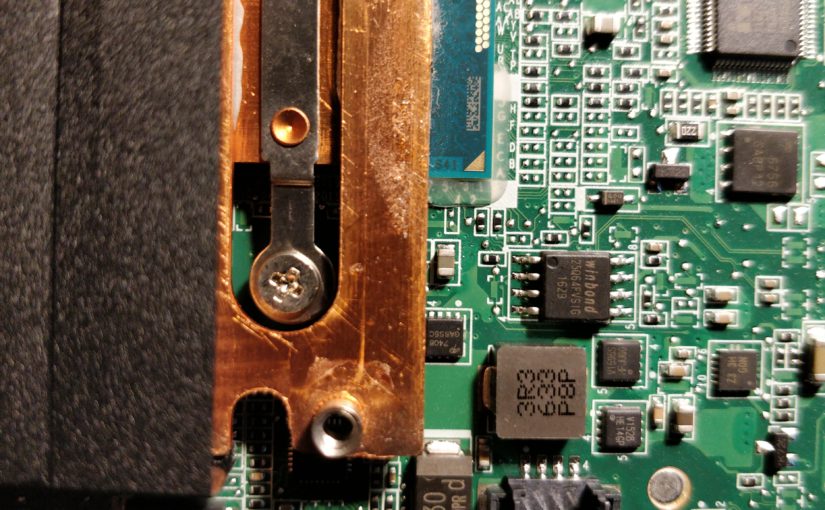
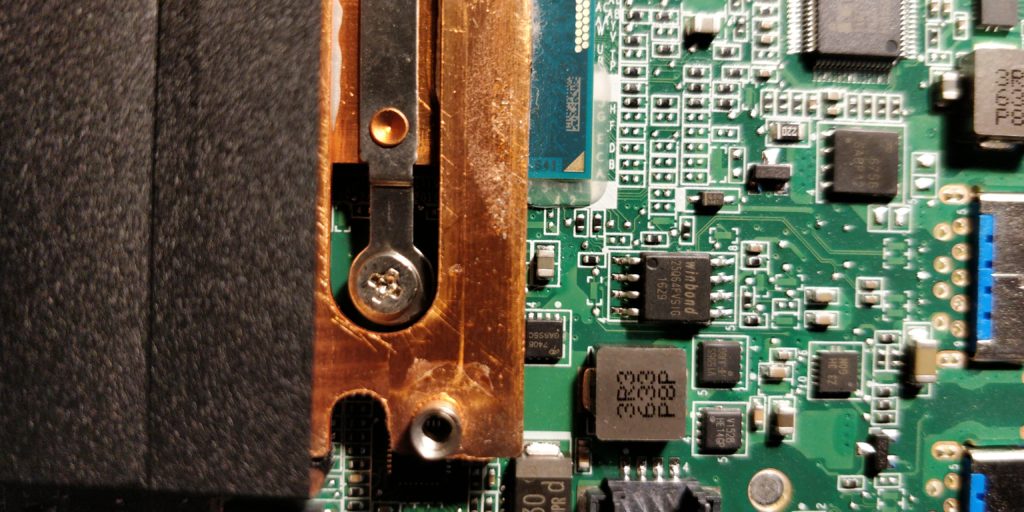
Unfortunately to get to the flash one needs to remove the board and the CPU fan.
To enable SPI on rPi (I had rPi Zero W) I ran raspi-config and selected SPI.
On rPi I also needed to install flashrom (apt-get install flashrom).
Using flashrom on rPi is pretty straight forward. Obviously the mainboard must be un-powered at all times (!!!). I removed all removable items (RAM, SSD, WiFi, SD card slot, RTC/BIOS battery).
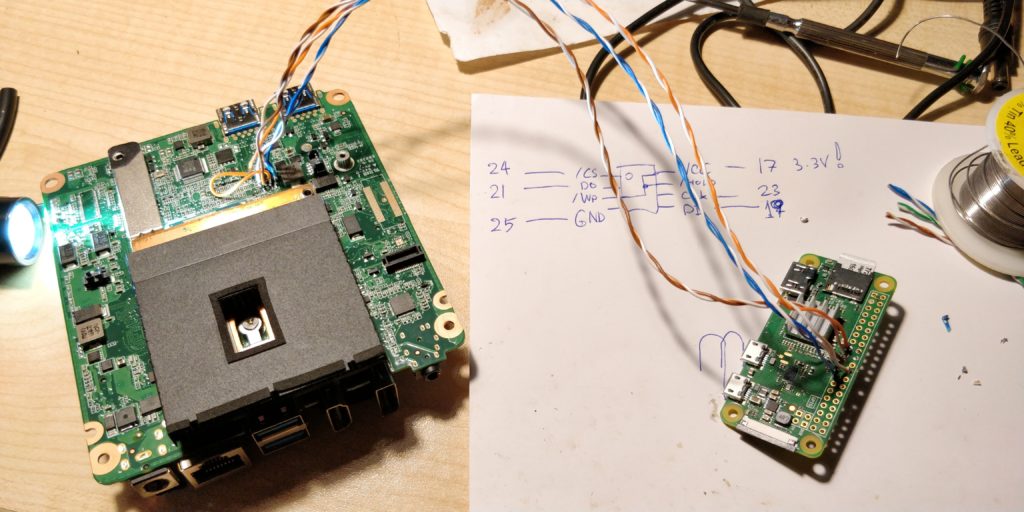
Due to lack of patience (and having no chip clip harness) I directly soldered the connections between Flash and rPi.
Note: pin #1 on the flash chip has a dot, and #8 is opposite to it (counted in circle).
I wired the chip in following way:
#1 Flash (/CS) ->   #24 rPi (GPIO8)
#2 Flash (DO) ->    #21 rPi (GPIO9)
#3 Flash (/WP) ->   #17 rPi (3V3)
#4 Flash (GND) ->   #25 rPi (GND)
#5 Flash (DI) ->    #19 rPi (GPIO10)
#6 Flash (CLK) ->   #23 rPi (GPIO11)
#7 Flash (/HOLD) -> #17 rPi (3V3)
#8 Flash (VCC) ->   #17 rPi (3V3)
I have wired pins 3,7 and 8 together on the flash to minimise the amount of wires going in between (only one went to the pin 17 on rPi).
Testing the connection:
flashrom -p linux_spi:dev=/dev/spidev0.0,spispeed=1000
 flashrom v0.9.9-r1954 on Linux 4.19.66+ (armv6l)
 flashrom is free software, get the source code at https://flashrom.org
 Calibrating delay loop… OK.
 Found Winbond flash chip "W25Q64.V" (8192 kB, SPI) on linux_spi.
 No operations were specified.
The deviations from this guide are following:
I have installed the cbfstool on my machine (as opposed to rPi) since it is compiled for x86. All operations with extracting the MAC addresses were done on my machine. I.E. I have saved the bad rom from via:
flashrom -p linux_spi:dev=/dev/spidev0.0,spispeed=1000 -r badflash.rom
 flashrom v0.9.9-r1954 on Linux 4.19.66+ (armv6l)
 flashrom is free software, get the source code at https://flashrom.org
 Calibrating delay loop… OK.
 Found Winbond flash chip "W25Q64.V" (8192 kB, SPI) on linux_spi.
 Reading flash… done.
I transferred it to my machine so I could use the cbfstool to embed back the MAC/serial info into the firmware.
The correct firmware for Asus CN60 is https://mrchromebox.tech/files/firmware/full_rom/coreboot_tiano-guado-mrchromebox_20191201.rom
As the codename is GUADO.
After embedding the MAC/Serial with cbfstool (see here) I transferred the file to the rPi, ready for flashing.
Flashing is done via following command:
flashrom -p linux_spi:dev=/dev/spidev0.0,spispeed=1000 -w coreboot_tiano-guado-mrchromebox_20191201.rom
 flashrom v0.9.9-r1954 on Linux 4.19.66+ (armv6l)
 flashrom is free software, get the source code at https://flashrom.org
 Calibrating delay loop… OK.
 Found Winbond flash chip "W25Q64.V" (8192 kB, SPI) on linux_spi.
 Reading old flash chip contents… done.
 Erasing and writing flash chip… Erase/write done.
 Verifying flash… VERIFIED.
Verifying just in case:
flashrom -p linux_spi:dev=/dev/spidev0.0,spispeed=1000 -v coreboot_tiano-guado-mrchromebox_20191201.rom
 flashrom v0.9.9-r1954 on Linux 4.19.66+ (armv6l)
 flashrom is free software, get the source code at https://flashrom.org
 Calibrating delay loop… OK.
 Found Winbond flash chip "W25Q64.V" (8192 kB, SPI) on linux_spi.
 Reading old flash chip contents… done.
 Verifying flash… VERIFIED.
After verifications I de-soldered the wires and reassembled the machine. This time I got the bunny logo and was able to boot from the USB (press ESC in first 5 seconds).
BTW if you have chip clip harness you could use this guide to completely bypass the whole unlocking and requiring to have functional ChromeOS, as you have to open the machine anyway to remove the write protect screw.