Interfacing PTC06 UART camera with micropython

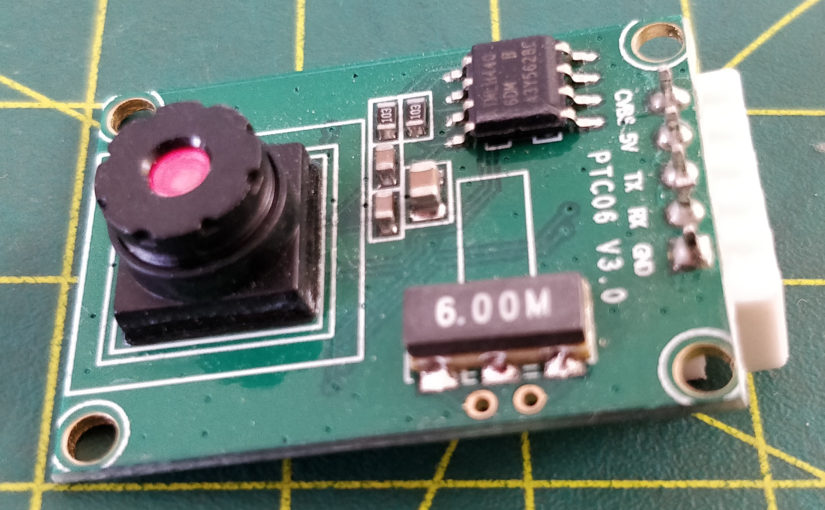
For a while I was looking a simple camera that I could use with micropython and ESP32 board.

Initially I looked at Arducam 2MP camera, but that turned out to be a real pain to interface with, and it took up way to many IO pins for my liking. The micropython is barely fast enough to actually do handle the packets. Of course there weren’t off the shelf library to do what I wanted. In addition the image quality was not great, even though it was a 2MP camera.

I decided to try a low cost UART (serial) camera instead. Downside is the camera only 640×480, the upside is that the power consumption is around 30mA (half of what the Arducam is). Another upside that the camera is physically smaller (specifically the lens). Most importantly the UART protocol the camera uses is very simple, and it only needs two IO pins to operate.

Continue reading Interfacing PTC06 UART camera with micropython

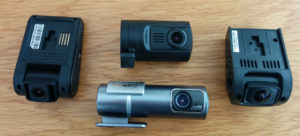
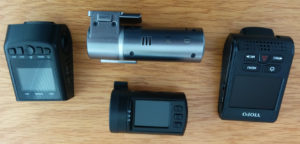
Predatory practices of Dash Cam manufacturers

Recently I was contacted regarding my dash cam GPS coordinate extraction script. The request was regarding wrong data being produced. I have addressed something similar in the past, so I decided to have a go at this one (I like a challenge).

Unfortunately I was presented with this:

00052eb0  00 20 00 00 63 6c 75 72  00 00 40 00 66 72 65 65  |. ..clur..@.free|
00052ec0  47 50 53 20 f0 03 00 00  59 6e 64 41 6b 61 73 6f  |GPS ....YndAkaso|
00052ed0  43 61 72 00 00 00 00 00  00 00 00 00 00 00 00 00  |Car.............|
00052ee0  00 00 00 00 00 00 00 00  16 00 00 00 16 00 00 00  |................|
00052ef0  39 00 00 00 e5 07 00 00  04 00 00 00 08 00 00 00  |9...............|
00052f00  41 4e 57 00 00 00 00 00  ad bb 79 aa 9f 20 c6 40  |ANW.......y.. .@|
00052f10  c9 fd 0e 45 91 98 c1 40  37 a6 75 41 33 33 a7 41  |...E...@7.uA33.A|
00052f20  33 58 5a 55 4e 4e 31 35  39 35 32 39 37 34 36 35  |3XZUNN1595297465|
00052f30  59 4e 44 53 01 00 00 00  00 00 00 00 00 00 00 00  |YNDS............|
00052f40  00 00 00 00 00 00 00 00  00 00 00 00 00 00 00 00  |................|

Poking about I realised the data is not simply obfuscated…

Eventually I stumbled upon this:
https://exiftool.org/forum/index.php?topic=11320.0

According to exiftool forum the player uses an internet service to decode the data, which is a huge bummer.

I will try to decompile the player but at this stage I don’t believe I will have any success.

To add an insult to injury the dash cam manufacturer asked the dash cam owner not a small amount of money to decrypt these coordinates. Actually you could outfit a small fleet with new cameras from Viofo for the amount of money they asked.

So here are the brands so far to avoid (do not buy them):

AkasoCar
ANKEWAY

or any brand that requires their own player to playback the coordinates.

nvtk_mp42gpx.py revisited – now with TS support

It appears that not only my quick hack of a script is popular but also that the dashcam manufacturers keep changing things.

In this case the biggest change (beyond utterly stupid data obfuscation) is the switch to the TS format.

In retrospect TS format is an obvious choice for something like dashcam as it is very resilient to crashes (no pun intended).

TS format unlike the MP4/MOV format is very simple, it is pretty much made up of fixed 188 byte segments which have ASCII ‘G’ as a header. The actual payload lives in last 184 bytes while the first 4 bytes are reserved for header (of course this is all simplified).

The biggest difficulty of adding TS functionality is that Blueskysea B4K camera was engineered by sadists and they split the payload into two packets (arbitrary cutting off at the seconds 4 bytes). If you are the person at the BlueSkysea who made this obfuscation – fuck you.

In anyway this update is massive rewrite.
Just to make it easy here is the script: nvtk_mp42gpx.py

2020 update of the nvtk_mp42gpx.py script

Surprisingly to me the script that I haphazardly put together turned out to be very popular.
I decided to quickly update it (after multiple feature and bug fixes requests)…

The highlights are:

  • Automatic finding of the correct position of the data block (more on that below).
  • Introduction of -m flag, which creates separete GPX file per input file (default behaviour is a single GPX output file for multiple input files).
  • More robust argument parsing (now it should always display help if wrong arguments are used)
  • Introduction of -d flag, which allows to de-obfuscate GPS coordinates.
Continue reading 2020 update of the nvtk_mp42gpx.py script

ILDVR – and their lack of professionalism

It all started with me purchasing ILDVR INC-MH40D06 IP Camera. I decided to poke at it and discovered some interesting and blatant security flaws.

About a year ago I contacted ILDVR (Arnold and Marika Wei) regarding the security issues, which got no response.
After about a year of the camera sitting on a shelf, I decided to poke at it again.
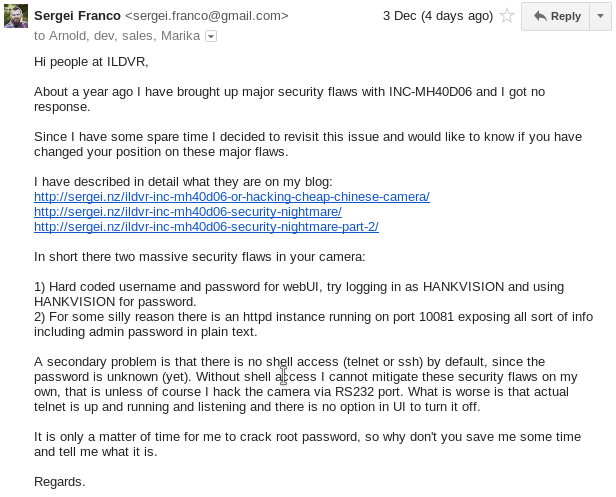
Which prompted me to send them this email:

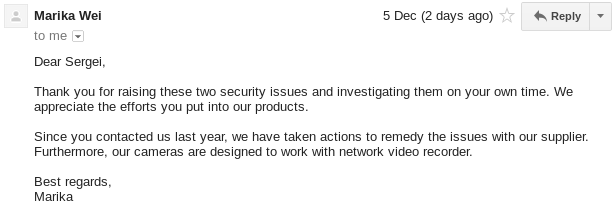
For which I got a friendly response from Marika:

To which I replied, asking for firmware update (which I thought was reasonable to expect firmware updates for products with serious security flaws):

The only response I got is this peculiar email from sales@ildvr.com:

So, it seems that:
1) ILDVR.com/ILDVR does not care about security
2) ILDVR.com/ILDVR does not care about PR
3) ILDVR.com/ILDVR does not care about customers

Perhaps they should adopt the following motto:

“GO TO HELL! – ILDVR (where security does not matter)”.

To be honest, I would probably let go this whole thing if they simply not responded. It would have taken them less effort to not to respond either. Instead they chose to send me email with “GO TO HELL!”. I find this thing very hilarious.

It is even more hilarious if you look at google search results:

ILDVR INC-MH40D06 security nightmare part 2

I have put off the ILDVR camera, as I kind of lost interest.
For previous posts see here, here and here.

I was bored so I decided to poke at again.

I was interested where does the camera store users and in what format. What I found out is an atrocious mocking of security.
The camera stores local users and their passwords (in plain text) in following file:

/mnt/flash/data/OwnUserInfo.txt

Yep: the same directory which is accessible without auth via port 10081. So if you forgot password (and forgot the silly hardcoded HANKVISION), then you can get a reminder what it is by simply going here:

http://${CAMERA_IP}:10081/OwnUserInfo.txt

There is also another “binary” file that contains interesting references to HANKVISION and local users:

/mnt/flash/data/UserInfo

strings that and you get following:

HANKVISION
e82f5af1f39f021b44e78089b5a40a8e0aa8d2768c705e8f139bec04d87d5a54
8f081b5a8e0685ca975a01d4159930f9
0d9a1f80bcc7a1e4a00f04588062ed67
admin
8c6976e5b5410415bde908bd4dee15dfb167a9c873fc4bb8a81f6f2ab448a918
21232f297a57a5a743894a0e4a801fc3
76eb00c6458e9b2755b570ae565ba0a6

Changing the password to HANKVISION reveals that this string is “encoded” “HANKVISION”:

e82f5af1f39f021b44e78089b5a40a8e0aa8d2768c705e8f139bec04d87d5a54
8f081b5a8e0685ca975a01d4159930f9

Not sure if the obfuscation is worth spending time on, especially when we already know HANKVISION is hardcoded in web server binary and OwnUserInfo.txt already contains passwords in clear texts.

strace-ing ‘webs’ process during certain conditions opens the /tmp/umconfig.txt, which contains following:

TABLE=users
ROW=0
name=HANKVISION
password=0d9a1f80bcc7a1e4a00f04588062ed67
group=Administrator
prot=1
disable=0
ROW=1
name=admin
password=76eb00c6458e9b2755b570ae565ba0a6
group=Administrator
prot=1
disable=0
ROW=2
name=adminadmin
password=5ca1e16e4fa3fa58b6656b9ad547fa0f
group=Normal
prot=0
disable=0
TABLE=groups
ROW=0
name=Administrator
priv=4
method=2
prot=0
disable=0
ROW=1
name=Normal
priv=4
method=2
prot=0
disable=0
TABLE=access
ROW=0
name=/browse/
method=2
secure=0
ROW=1
name=/jpgimage/
method=2
secure=0
ROW=2
name=/mjpgstreamreq/
method=2
secure=0
ROW=3
name=/form/
method=2
secure=0
group=Administrator
ROW=4
name=/cgi/
method=2
secure=0

The “hashes” correlate to /mnt/flash/data/UserInfo…

Looking firmware upload function (in browse/javascript/sysInf.js) I found this bit:

function fileUpload(){
...
		var typeAllow = [".ifu", "macaddr.txt", "deviceid.txt", "sn.txt", "audio.dat", ".bin", ".png", ".ifc", ".lib", ".uid", ".pid","logo.gif","whitelist.txt"];
		var fileType = ["ifu", "mac", "deviceid", "sn", "audio", "bin", "png", "ifc", "lib", "uid", "pid","gif","wlst"];
....

I have tested the upload function with logo.gif and that worked: the logo on top got replaced, so it brings a possibility of doing something more (sneaking in a binary?).

Looking at ‘webs’ binary I decided to google for strings in case someone leaked the source or these bastards stole somebody else’s work.
Here what I found:
The string:

webs: websWrite lost data, buffer overflow

Matches suspiciously named file here:
https://github.com/socoola/yhrouter/blob/master/user/goahead/src/webs.c

Same could be said for these strings:

webs: Listening for HTTP requests at address %s
webs: accept request

What is surprising is that they avoided doing execve calls where they could. IP addresses, routes, all set via ioctl, even time is set via settimeofday function. This removed possibility of command injection.

Here is what I believe is going on with this firmware:

The video side and core functionality has been lifted off SDK by Hisilicon. The web server stuff has been implemented by actual Hankvision people, most likely low paid undergraduate Chinese students. The core web server functionality has been lifted off the internet (see above).

What could have been done better without spending much on development:

Remove hard coded passwords!
Throw away all activeX crap (use MJPEG stream for “preview”).
Turn off telnet and leave ssh on with configurable password (perhaps make it a separate user?).
Do not store plain passwrods anywhere
Throw away all the dyndns and cloud nonsense.
Add actual off checkbox for FTP, Mail and SIP stuff (and possbly throw away SIP stuff).
Add VLC plug-in functionality.
Remove web server that listens on port 10081 exposing whole bunch of private data.

I am not sure what they are trying to achieve by not allowing SSH/Telnet access, but this is counter productive. I will not buy a security product to which I do not have control! Besides if I wanted to get access to your firmware, I don’t need SSH or Telnet, when I have RS232 and soldering iron.

For those who purchased this camera, if you really have to use it do the following:

Hexedit webs binary and change the HANKVISION bit to something else

And

Remove gateway setting (set it the same IP as camera) and preferably isolate camera from rest of the network (separate VLAN and port forwarding to recorder).

Or

Just chuck it in the bin and never purchase anything from ILDVR again.

Shame on you ILDVR for not responding to me when I contacted you almost a year ago about hard coded passwords. Shame on you ILDVR for not providing root password or firmware updates.

python OpenCV basic motion detection

Here I will describe how I use OpenCV for capturing RTSP streams, with purpose of motion detection.

For basic OpenCV I use these two libraries:

import cv2
import numpy as np

cv2 is OpenCV library (second version), and numpy is python numeric lybrary (useful for manipulating matrices among other things).

To initiate capture one simply does following:

cap = cv2.VideoCapture('rtsp://192.168.1.69:554/Streaming/Channels/2')


In this example I use second stream (of lower resolution) for motion detection.

From there you can get heigh and width of the frame (this will be useful later):

width = cap.get(3)
height = cap.get(4)

I use BackgroundSubtractorMOG for motion detection (somewhat cheating ;)):

bg = cv2.BackgroundSubtractorMOG(100,3,0.6,30)

The magic is in parameters, I used following:
100 – history
3 – number of Gaussian mixtures
0.6 – background ratio
30 – noise strength
The numbers above are not necessarily “correct” but I came to them with error and trial (and “guestimation”).
Here is document in detail describing this algorithm: http://personal.ee.surrey.ac.uk/Personal/R.Bowden/publications/avbs01/avbs01.pdf

The actual capture loop looks something like this:

while(True):
    ...
    ret, frame = cap.read()
    motion = bg.apply(frame, learningRate=0.005)
    kernel = np.ones((3, 3), np.uint8)
    motion = cv2.morphologyEx(motion, cv2.MORPH_CLOSE, kernel, iterations=1)
    motion = cv2.morphologyEx(motion, cv2.MORPH_OPEN, kernel, iterations=1)
    motion = cv2.dilate(motion,kernel,iterations = 1)
    contours, hierarchy = cv2.findContours(motion, cv2.RETR_EXTERNAL,cv2.CHAIN_APPROX_SIMPLE)
    ...
ret, frame = cap.read()

captures a single frame

motion = bg.apply(frame, learningRate=0.005)

extracts a black and white image with the background removed (learnignRate value has been chosed by error and trial).

Next four lines simply manipulate extracted image in such that it does following:
MORPH_CLOSE: removes small holes (up to 3×3 pixel, defined by kernel) within the object (“white”) in the extracted motion matrix.
MORPH_OPEN: removes small dots within the “background” (black) in the extracted motion matrix.
dilate: is making sure there all adjacent islands are joined together, so when we extract contours we get small amount of contours as result.

The “3×3 pixel” block comes from here:

kernel = np.ones((3, 3), np.uint8

The last step from processing frame is extracting the contours:

contours, hierarchy = cv2.findContours(motion, cv2.RETR_EXTERNAL,cv2.CHAIN_APPROX_SIMPLE)

The extracted contours can then be iterated and hull drawn around them:

for cnt in contours:
    hull = cv2.convexHull(cnt)

The hull points then can be checked against the mask if motion is inside of the area of interest:

Lets define the mask as the whole frame (I am pretty sure there is a better way;)):

mask_points = [
( 0 , 0 ),
( 1 , 0 ),
( 1 , 1 ),
( 0 , 1 ),
]

mask_array=[]
for point in mask_points:
    mask_array.append([[int(point[0] * width ), int(point[1] * height )]])
mask = np.array(mask_array, np.int32)

This looks cumbersome, but what I am achieving here is converting mask_points list of human readable relative coordinate tuples (eg: centre will be at (0.5,0.5)). Mask can be defined as a polygon with relative positioning of each corner to the frame (independent from pixel size).

We check if hull point is inside our mask

for point in hull:
    distance = cv2.pointPolygonTest(mask,tuple(point[0]),1)
    if distance > 0:
        it_is_inside()

and vice-versa (in case if mask is smaller than the frame):

for point in mask:
    distance = cv2.pointPolygonTest(hull,tuple(point[0]),1)
    if distance > 0:
        it_is_inside()

The above will tell if the motion contour extracted is within of area interest.
In addition to the checking if the motion happens withing of area of interest the severity/size of motion can be calculated by calculating the area of the hull via the following:

area += cv2.contourArea(hull)

which then can be compared with the total area:

surface = cv2.contourArea(mask)

The ratio can be converted to a percentage value and thus be used to trigger the recording if the value is above certain threshold:

relative = area * 100.0 / surface

I use ffmpeg for actual recording (it is way more efficient than dumping frames from HD OpenCV capture). I simply launch an ffmpeg subprocess when motion is detected and send a SIGTERM when motion is over:

p=subprocess.Popen(record_cmd,shell=False) # motion start
....
p.terminate() # motion stop

Note: the ffmpeg will cleanly close the recording if it sent the SIGTERM (opposed to SIGKILL).

For debug and entertainment purposes the image could be displayed via following:

To draw contours and hulls:

for cnt in contours:
    hull = cv2.convexHull(cnt)
    cv2.drawContours(f, [cnt], 0, (0,255,0),1)
    cv2.drawContours(f,[hull],0,(0,0,255),1)

Note: The colour is defined by this tuple: (0,255,0)

Then do display the whole thing insert this inside of the while(True):

cv2.imshow('motion',frame)
k = cv2.waitKey(30) & 0xff
if k == 27:
    break

The above is basic idea behind my motion detection scripts. I have omitted a lot of glue logic and arithmetic due to my script is not ready for public display ;).

Extracting GPS data from Viofo A119 and other Novatek powered cameras

The script.
nvtk_mp42gpx.py
Here it is: nvtk_mp42gpx.py
Alternative version: nvtk_mp42gpx_older.py

What does it do?

This script will attempt to extract GPS data from Novatek MP4 file and output it in GPX format.

Usage: ./nvtk_mp42gpx.py -i<inputfile> -o<outfile> [-f]
        -i input file (will quit if does not exist)
        -o output file (will quit if exists unless overriden)
        -f force (optional, will overwrite output file)

In short: it takes Novatek encoded MP4 file (with embedded GPS data) and extract GPS data in GPX format (as separate file). Note; it does not modify the original MP4 file.

In long:

Continue reading Extracting GPS data from Viofo A119 and other Novatek powered cameras